
At some point throughout its lifetime, any website will want or need to collect information. Whether that is user information for something as simple as a newsletter, or information that allows commerce from all over the world to take place. Without being able to collect information, all websites would in essence be a brochure. So how do we collect that information? Read until the end and we will create a form based on the featured article image.
When dealing with websites, forms are used to collect information. In the HTML language, a form is created with the form tag.
<form method="POST" action="http://www.mysite.com/collectuser">
<!-- add form elements and text to communicate to user the information needed -->
</form>
This gives an outline (start and end) for your form on the web. The easiest way to think about a form is to look at a real form if possible. For example, a job application is a form. You can grab the job application and move it to the internet by looking at the text and controls. Anywhere you have input boxes, you’ll most likely use the input text element. If you have a check box such as radio buttons suggesting to check your ethnicity, then you’d use an input radio element or input checkbox element for those options.
What is A Form?
Let’s talk about what a form is and isn’t. A form is HTML’s version of a real form life form that is expected to be filled out. In the same way you can freely draw a form for your company, HTML allows you to freely put together your form. The things you may draw in a form and expected inputs have already been discovered by the creators of HTML. New discoveries will get put into future versions of HTML. So what types of things do you expect from the user when you draw your form? You’d most likely expect text input for their personal information. Check boxes for areas they find interesting and radio buttons for a choice such as choose your color. These are all inputs in HTML forms. So you may have input type=text, type=radio, and type=checkbox. Input types include (text, password, checkbox, radio, submit, image, reset, button, hidden, and file).
What a form isn’t is some complicated part of HTML that magically creates the form for you. If you see a complicated form on the web, that just means that a bunch of elements and most likely lot’s of CSS and JS were used to create it (think tax form companies). They still use the really simple things and form elements that will be discussed in this article.
HTML Form Basics
Each form element has a name value pair (including select and textarea and all other form elements). These are the values submitted to the back end server in the chosen HTTP method. HTTP methods tell the page how to transfer the information. You can use GET or POST. GET data is sent as name value pairs within the url, where as POST is sent within the body of the form as name value pairs.
Let’s do a simple example.
<form name="myform" method="POST" action="/">
  <p>Name:</p>
  <input type="text" name="fname" value="" />
  <p>Last Name:</p>
  <input type="text" name="lname" value="Default last name" />
  <input type="submit" name="submitPressed" value="Send Now" />
</form>
So here we create a simple form that asks for a first and last name and collects that information while displaying a Send Now button. So if I looked at the form, I’d enter 2 values that correspond to my name. If you look at the form, you’d enter 2 values that correspond to your name. We don’t know what the user will enter, we just know that it will be stored in the name section of the input. So for example, if we want to get the first name that was entered, we’d use POST[‘fname’] and if we want to get the last name, we use, POST[‘lname’] and we can check if the form was submitted by seeing if the name submitPressed is in the POST array with the value Send Now.
We can also add hidden values that may identify information we need to process this form. For example, if we have relationships that we need to store in a database, we may add a hidden input element with the id for the record that needs to be updated.
So a form can range from a job application to a gym membership new client form. Being able to transform a physical form to an online form should be straightforward and predictable. Radio buttons although they allow you to select from multiple choices only sends one value (the radio button that was selected). Just like in a real world form, if you look at an option with radio buttons, you would only tally the selected option and not the others that exist in the form.
HTML Form Extras
The input element has the following attributes. These can be added to your element to have more control over how the form functions. (name, value, size, maxlength, checked, src, readonly, disabled) and so forth. Adding some of these attributes to the element can change the behavior of the element. Let’s say we want to limit the input of the first name to 32 characters. We can update the element and add the maxlength attribute . Simply adding this attribute (maxlength) changes how the browser allows the user to interact with the element.
Let’s look at the almost hierarchical nature of forms. Let’s define an input element. An input element is an element that expects to collect an input. This means it can be a text box, a check box, a radio button and so forth. This same concept is also in HTML.
Let’s create some of these.
We want a checkbox. So we add
<input type="checkbox" name="somename" value="checkvalue" />
We want a reset the form button.
<input type="reset" name="somename" value="Reset" />
We want a text box so the user can enter text
<input type="text" name="fname" />
And so forth. If we want multiple lines of text, for example we want to collect the description of something, we can use the textarea element. This element will usually only exist within the context of a form. In addition, the placeholder attribute can set default text (informational) for an input element that disappears when the user starts to type in the box.
Now one of the cool things about a web form is not only the different types of elements already ready to go out of the box, but that the form can also do a little bit more. Pictures are usually files that most people are familiar with. So let’s assume you are creating a profile and want to add an image to the profile. On a real world form, it would be almost impossible to add an image unless you came with a printed out image of yourself due to prior instructions. However, with forms on the computer, we can receive images (or any other file type) from the user into our forms and store them on the web server.
HTML Form File Uploads
In order to do this, we want to update an attribute in the form element, enctype. We want to set it to multipart form-data, which allows the file contents to be packaged in a separate section from the normal inputs.
<form enctype="multipart/form-data" method="GET" />
Please upload your image: <input type="file" name="profile" />
<input type="submit" />
</form>
By changing the form element enctype and adding an input of type file, we can now accept a file from the user’s computer into our form. This does come with caveats as far as security is concerned, but an experienced developer should be able to handle those quite easily. Also note, by adding the input file type, you are telling the browser that you require a file in this input. The operating system is responsible for actually getting the file into that input. You do not have any control over how the file gets to your form. And you shouldn’t otherwise, nothing would be secure. Just ensure that when you receive the file, it is the right type and within your acceptable file size. To understand this more, think about clicking a an HTML file input element on your phone vs a desktop computer.
HTML Form Events
In addition to the elements on your page, each element might be interacted with. For example, if you have an input element (not the text that explains the input, but the element itself), it can have focus and lose focus. It can be typed into and so forth. Here are some of the common events.
INPUT ELEMENTS
onfocus – element comes into focus
onblur – element leaves focus
onselect – element selected
onchange – element changed
onclick – element clicked
ondblclick – element double clicked
INPUT/BUTTON
onmousedown – mouse is pressed down
onmouseup – mouse is released after pressed
onmouseover – mouse moves over element
onmousemove
onmouseout – mouse leaves element
onkeypress – key is pressed
onkeydown – key is down
onkeyup – key is released after pushed down
Advanced HTML Forms
You will also see a label type frequently in forms. These are good options since they allow you to associate text with an input element. To make this convenience happen, you will need to have for and id match. The code below is how to attach a label (for) to an element (id).
<label for="fname">First Name</label> <input type="text" id="fname" value="" />This label is now linked to the input element in the form (notice for=”fname” and id=”fname” for respective elements). So a user can focus the first name input element by either clicking the input box or the label. In other words, if the user clicked the text First Name on the screen, the mouse will focus on the input element. This is a nice convenient feature to have that makes the form user friendly.
If you’d like the form to look more like an application on printed paper broken off into sections, then it will be beneficial to use the fieldset and legend elements. The fieldset usually provides a border around the fields and the legend displays the section text in a noticeable way.
In general, users prefer to fill out forms with the keyboard. After all they have to type and voluntarily provide their information. You can only type with a keyboard and tab is usually a convenient way to move from input to input. You may have checkboxes in your form and when the user hits tab, it tries to focus the checkbox. To change this behavior and allow the tab to move to another element for text input, you can add tabindex as an attribute to the elements. The lower the index, the higher priority and the order in which elements will be focused.
Finally, you can have inputs that are for display purposes or might be enabled after payment or some checkboxes have been checked. For this type of form behavior, you can use disabled or readonly attributes to make is so that the box cannot have information entered into it.
Creating an HTML Form From A Real Form
Now let’s create the form in this article’s feature image. We’ll translate the parts we see from an actual real world form to an HTML form. This should help solidify your understanding of website forms.
<html>
<head>
<title>My Example Form</title>
</head>
<body>
<h2>Contract</h2>
<form>
<fieldset>
<legend>Model Information</legend>
<p>Name: <input type="text" name="modelname" /></p>
<p>Address: <input type="text" name="address" /></p>
<p>City: <input type="text" name="city" /></p>
<p>State: <select name="state"><option value="GA">GA</option><option value="FL">FL</option></select></p>
<p>Country: <input type="text" name="country" /></p>
<p>Zip/Postal Code: <input type="text" name="zip" /></p>
<p>Phone: <input type="text" name="phone" /></p>
<p>Email: <input type="text" name="email" /></p>
<p>Date Of Birth: <input type="text" name="dob" /></p>
<p>Date: <input type="text" name="date" /></p>
<p>Description Of Scene: <textarea name="scene"></textarea></p>
</fieldset>
<fieldset>
<legend>Model Ethnicity</legend>
<input type="checkbox" name="ethnicity" value="Asian" /> Asian <input type="checkbox" name="ethnicity" value="Black" /> Black <input type="checkbox" name="ethnicity" value="European" /> European <input type="checkbox" name="ethnicity" value="middle" /> Middle Eastern <input type="checkbox" name="ethnicity" value="pacific" /> Pacific Islander <input type="checkbox" name="ethnicity" value="African" /> African <input type="checkbox" name="ethnicity" value="Caucasian" /> Caucasian <input type="checkbox" name="ethnicity" value="Hispanic" /> Hispanic <input type="checkbox" name="ethnicity" value="Native" /> Native American <input type="checkbox" name="ethnicity" value="Mixed" /> Mixed Race <br /> <input type="checkbox" name="ethnicity" value="other" /> Other <input type="text" name="othertext" />
</fieldset>
<input type="submit" value="Send Form" />
</form>
</body>
</html>
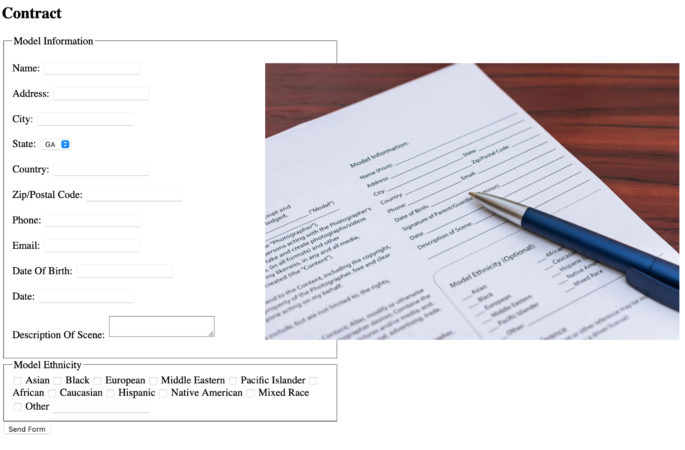
Note that although the real world form has state as a text input, to reduce errors, we usually let the user select a state from a drop-down select menu. That way, it is hard for the user to type in an incorrect state and most likely make your program appear more sloppy. Other than that, it looks pretty much just like the real world form and you can now see the role of fieldsets and legends more clearly. The legend describes the fields (fieldset) you’re about to fill out. You should now have a pretty solid understanding of HTML website forms. Thumbs up if so!