Learning the physics and skills to become a great photographer can be both a worthwhile and rewarding journey. Photographs are an amazing invention, motion pictures even more amazing. However, to become a competent and professional photographer, there are 3 concepts every photographer must understand.
Camera Aperture
In photography, aperture refers to how large the opening to the sensor that covers the lens is. The bigger the the lens opening (lower aperture) the more distance blur you will have in front and behind the point of focus. There are very complicated physics behind this technology but they really just mimic your eye. Try this .. look straight and have at least 3 objects within range of view. One far, one close and the one in between. If you look at (focus on) the one in the middle, are the ones close or far in focus? Probably not, so the camera does all these amazing things your eyes are also capable of doing. A higher aperture means that the camera lens opening is very small with a high depth of field. With a high aperture, a majority of the image will be captured with descent sharpness regardless of what the camera is focused on.
Shutter Speed
This is how long the exposure (camera eye opening) stays open for. The faster it opens and closes, the less light that can reach the lens and the more motion is stopped. A slow shutter speed, lets in more light, but motion can be a problem if ignored.
ISO Speed
The last thing a photographer must know is ISO speed. ISO tells the camera how sensitive it should be to light. If the ISO is high, that means be very sensitive at the expense of grainy. If the ISO is low, then it should be less sensitive to light but higher quality.
Ok, now we know the basics hopefully, let’s see why all photographers must know these as we observe photographs in action.
But before we go to action, let’s discuss shutter speed a bit more. Your creativity can run wild with shutter speed. You can stop anything in its tracks and I mean anything. You can keep the shutter open longer and record light movements with BULB mode. You can also slow down the shutter speed and imply motion (panning).
We also need to talk about exposure. Exposure is when the correct amount of light is hitting the sensor for the settings selected. This cannot be overlooked because unfortunately some of the cool things have their limitations. In DSLR cameras, you can most likely look within the lens to see if your image is properly exposed.
Having a happy balance amongst these 3 things is the key to great photography. Knowing how to create that harmonious balance based on the creativity of the image takes a little practice. So let’s take a look at some photographs in action.
Tradeoffs
- Low aperture (More light) vs High aperture (Less light)
- Slow shutter speed (More light) vs Fast shutter speed (Less light)
- High ISO (More light) vs Low ISO (less light)

We have a water splash where we can literally see the water droplets as gravity begins to take hold. The human eye cannot process this, yet the camera can. Once again, simply amazing. But let’s focus on how you can also get amazing results. Looking at this picture, we have a low aperture (you can see that the water particle in focus is much more in focus than those nearer the camera). We also have a fast shutter speed. We know this from understanding that this is a fast moving image halted in motion. So let’s look at our tradeoffs, and we have less light from shutter and more light from aperture. In this case, ISO is not necessarily needed.
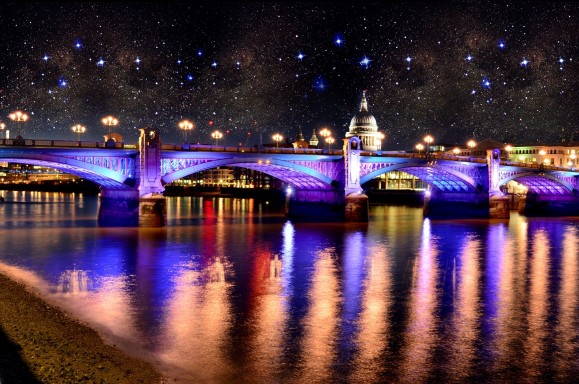
Now we have a picture of a skylight in London. We can tell from the picture that it has a high aperture since pretty much all of the image is in focus. We also have a slow shutter speed because experience teaches you that for the street lights to look like that, it might verge on bulb mode depending on the size of the lights. We’ll discuss bulb mode next, but let’s look at our tradeoffs. We have more light from shutter speed and less light from aperture. Once again a happy medium that may not need ISO adjustment. However, since this was caught at night, it is very likely a tripod was used for stability.
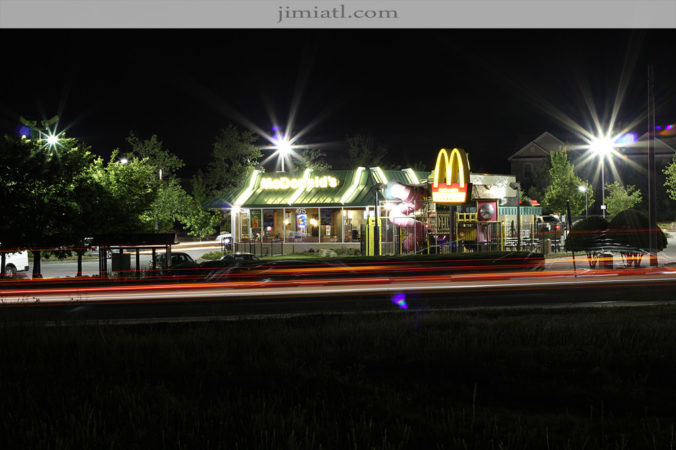
Now we have a picture of McDonald’s at night. This was one of my first bulb mode images. Those star lights are usually a giveaway for bulb mode, but the car light streaks are a dead giveaway. In bulb mode, the shutter stays open for much longer than usual so that all light is recorded as long as the lens is open. When the lens is finally closed, it produces the image. In this case, you might argue the lens was left open too long as there is much spill over from the parking lights.
So let’s recall this is a bulb mode image taken at night. Let’s study it for a minute. We can see the grass stays decently dark, but certainly does not imply any motion. This is because the whole time the lens was open, the grass did not give off any light in movement. Now let’s look at the actual McDonald’s building. The parts of the building with no light seem to be pretty solid as far as visibility. The lighted up parts seem to be very full of light and parking lights seem to give off light in many directions. This is because light moves and is recorded by the camera as it moves from its source to what it is lighting up.
So even inside the McDonald’s, you can see it well lit in there and the lights inside have the same effect as the parking lights. We can also see the car streaks. Ok, let’s move to our trade offs. Long shutter speed is more light and high aperture is less light. But keep in mind, no one can hold a camera completely steady for 30 seconds or so. So a tripod and remote trigger are needed!
Let’s go back to our trade offs to ensure we understand why they are so important. We’ll just use night and day for this example. So let’s assume its daytime and the sun is out giving us the ultimate light source. In such a case, we’ll most likely not want to have trade offs that give us a lot of light. What do I mean? Let’s say you want to record movement in an image with blur but it is noon time. Well that requires low aperture and slow shutter speed. Our trade offs both say this will give us more light. But it is already the middle of the day with plenty of light. This means way too much light will hit your lens and you’ll have an over exposed image. ISO will not help because it will only make your lens more sensitive to light. Knowing this, you wait until sunset to record the image or you sacrifice the blur or movement.
Now let’s assume it is nighttime where you have something you want to record without blur, but need a high shutter speed to capture it clearly. Let’s look at our trade offs and we realize less light with high shutter speed and less light with high aperture. But it’s already nighttime! This can’t result in a good image. ISO to the rescue. Let’s bump up the ISO to save us at this night event, but we can certainly expect much more grain in the image.
So there are many tools that exist to aid in these situations, but to the professional, this can usually be avoided by knowledge of how the camera works. And to even aid you, the camera can do much of the balancing for you.
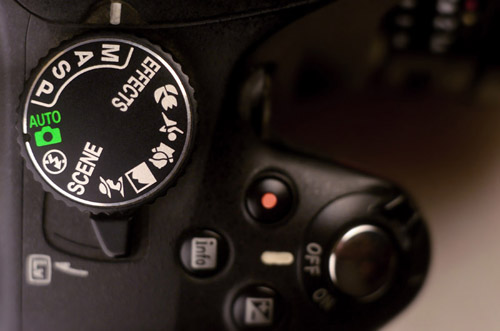
If you want to focus on blur and not worry about shutter speed (stopping motion etc), the set your camera to aperture priority mode. You choose the aperture, the camera will determine the correct shutter speed to correctly expose the image. The sibling to that is shutter priority mode, where you choose the shutter speed and the camera chooses the aperture for you. In this case, you are telling the camera, I do not care if the whole image is in focus or just what I focus on, just make sure the shutter speed is here. This is actually quite useful in night time photography without a tripod. Setting shutter priority can ensure you will get a descent image without motion blur everywhere. You can also take complete control with manual as long as you understand the light the camera sees can change by shifting 15 degrees.
You can also look at our galleries to learn more about how different images get captured and the adjustments made. As you can see, the number of choices prior to a button press can be very involved and it is easy to miss shots when starting out. Do not be discouraged as it will all become second nature with practice and studying why each image came out the way it did. Good luck in your endeavors and check out our event photography service if you are in need of a photographer!